How to Read Nike Shoe QC Photos: When to Request Reshoots
## This Article Only Solves One QC Decision This article revolves around the Nike SB Dunk Low "Steamboy OST" by Otomo Katsuhiro in Mocha Suede on the fashion-reps product detail page, addressing a specific problem: after entering the product page and clicking View QC Photos, how to judge which items already have sufficient visible evidence based on the existing photos, which items need reshoots, and when to pause further actions. After reading, you should be able to accomplish three things: conf
Marcus LindqvistMarcus Lindqvist is the site's Editor in Chief, approving every order sheet and writing most of its shipping-line comparisons. His coverage includes agent fee structures, freight-line selection, customs and duty information, and QC photo checks. He approves the order sheet before checkout, then records checkout-to-warehouse, QC photo turnaround and line-handover times to the hour. He weighs and measures every parcel before opening it, films the unboxing on a fixed tripod, and checks fee and duty calculations against the actual invoice two weeks after arrival.
Editor score 4.2 / 5
Insight
This Article Only Solves One QC Decision
This article revolves around the Nike SB Dunk Low "Steamboy OST" by Otomo Katsuhiro in Mocha Suede on the fashion-reps product detail page, addressing a specific problem: after entering the product page and clicking View QC Photos, how to judge which items already have sufficient visible evidence based on the existing photos, which items need reshoots, and when to pause further actions.
After reading, you should be able to accomplish three things: confirm the photos correspond to the target product, check the upper, toe, sole, size, color, and accessories in a fixed order, and save a reshoot request with the problem location and photo number. This article does not judge authenticity, nor guarantee materials, workmanship, or final wear performance; matters that cannot be shown in photos must remain uncertain. 🔍
First Confirm the Target Nike Shoe from the fashion-reps Product Detail Page
First open the product's detail page and check whether the product name is Nike SB Dunk Low "Steamboy OST" by Otomo Katsuhiro in Mocha Suede. The page information describes it as a low-top SB Dunk Low, primary color mocha, upper material suede, and lists sizes 36 to 46 including some half sizes. The page also shows matching laces and padded collar and other product information.
This content belongs to the product detail page information and does not equal facts already proven by QC photos. Before purchasing, reconfirm the currently displayed size, color, inventory, product price, and purchase channel on the page. The reference price on the page does not include final service fees and international shipping, and actual costs should be based on the settlement page of the selected shopping agent. Prices, inventory, and link status may change, so do not treat the product information in this article as a permanent commitment.
Before entering QC inspection, record:
- Full product name
- Selected size, whether half size
- Selected color or colorway name
- Order quantity
- Accessory description shown on product detail page
- Product identification information in current order or cart
If the detail page shows a different colorway, size, or product, do not continue using this checklist. 🧾
Enter the Corresponding Photo Gallery via View QC Photos
After confirming the product detail page, click the View QC Photos button on that page to enter the QC photo gallery corresponding to this product. Do not guess the QC address directly, and do not replace QC original photos with category pages, brand pages, homepage, other product images, or product main images.
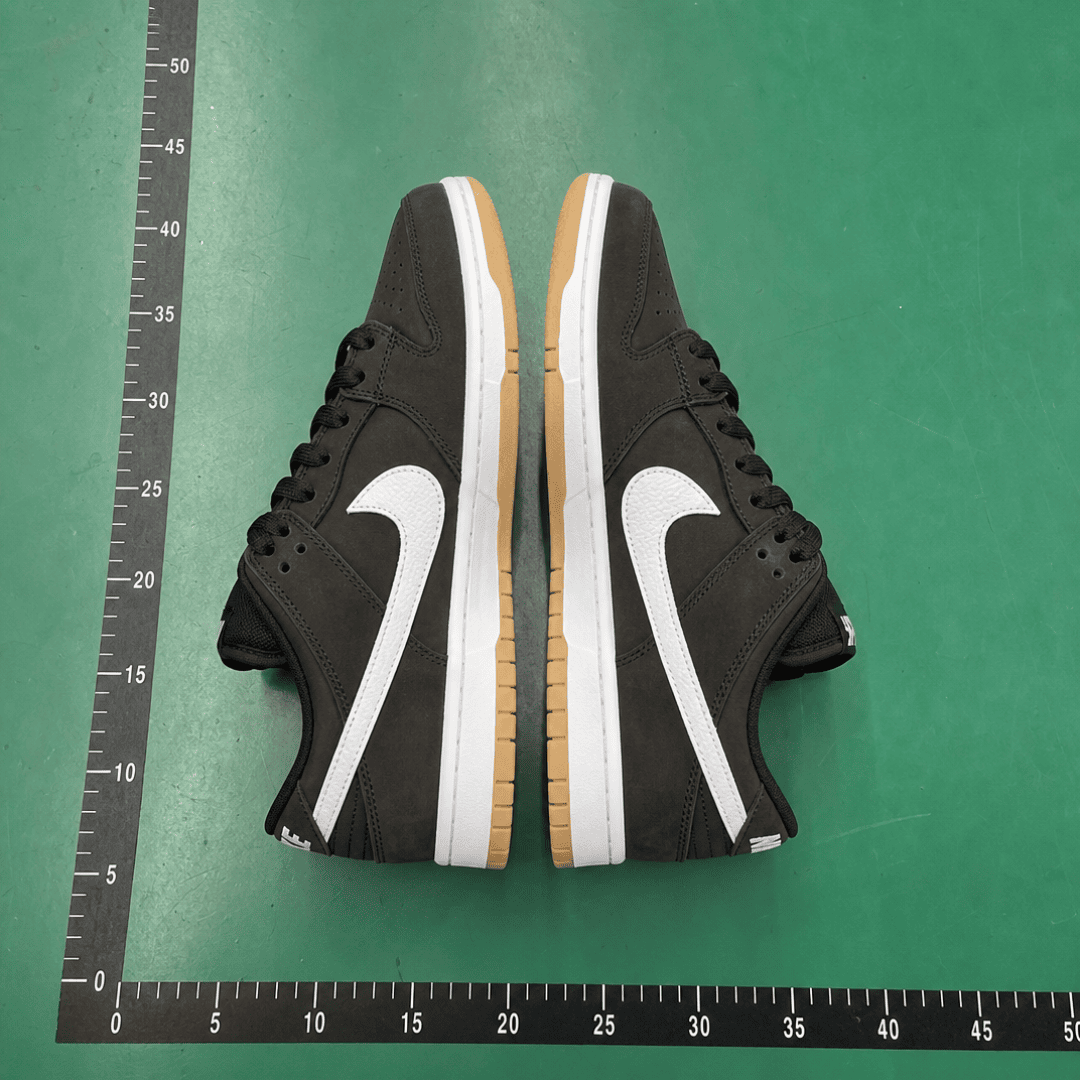
The photos specified in this article correspond to the product Nike SB Dunk Low "Steamboy OST" by Otomo Katsuhiro in Mocha Suede, and are used to help illustrate the QC photo inspection process for this product. The photos themselves are not independent proof of authenticity, nor can they prove the condition of the shoes outside the photos.

After opening the gallery, first confirm the source:
- The photo page or gallery context corresponds to the above product name.
- The left and right shoes, soles, shoe box, or accessories in the photos do not have identifying information clearly belonging to other products.
- The photo clarity is sufficient to observe the parts to be judged at present.
- The photos are not duplicate thumbnails, nor promotional images that only show the product detail page.
- For photos whose correspondence cannot be confirmed, mark them as pending verification and do not use them as a basis for approval.
If the gallery contains photos of other products, pause judgment and reconfirm the product context. Do not assume evidence is sufficient just because there are many photos.
What to Check Item by Item for Upper, Toe, and Sole
The following sequence is suitable for checking photos one by one. The editorial judgment only indicates risks that should be paid attention to, not that the photos have shown defects.
Upper and Suede Areas
First observe whether the colors of the corresponding panels of the left and right shoes are roughly consistent, then check the suede surface for obvious creases, abnormal reflections, large color differences, glue overflow, or uneven edge bonding. For suede, light, shooting angle, and nap direction in the photos can cause light and dark changes, so small color differences cannot be judged as defects based on a single photo.
Compare the same parts of the left and right shoes at similar angles. If only one shoe has abnormal local color, or the photo angle is insufficient to cover that area, you can request a reshoot of left and right shoes comparison photos under natural light.
Toe and Forefoot
Check whether the toe contours are basically symmetrical left and right, and whether the toe panels have obvious creases, collapse, stains, or exposed glue edges. Toe shape is affected by placement and shoe fillers, so slight deformation in photos does not necessarily mean a finished product defect.
When needing a reshoot, request:
- Both left and right shoe toes in the frame
- Camera at front or slightly above the upper
- Avoid strong reflections blocking stitching and panel edges
- Keep enough frame to show the relative shape of the two shoes
Sole and Outsole Edge
Check whether the outsole has obvious stains, cracks, abnormal wear, edge glue overflow, or color clearly inconsistent with the colorway on the detail page. Sole photos must cover the forefoot, arch, and heel; cannot judge the whole shoe based only on partial sole screenshots.
Sole photos can also help confirm whether the left and right shoes belong to the same pair, but cannot prove sole durability, grip, or long-term use performance. If the sole tread, color, or edges are obscured by shadows, request reshoots in both flat and side angles. 👟
Stitching, Printing, and Detail Areas
Check whether the stitching has obvious skipped stitches, long thread ends, broken threads, stitches deviating from edges, or left-right differences. Check whether prints, logos, and patterns are clearly misaligned, peeling, stained, or obscured by reflections.
Small logos in photos should only be used for appearance check, not for authenticity identification. Unclear logos should be marked as undeterminable, not guaranteed based on similar appearance.
You can use the following recording method:
| Check Area | Visible Evidence in Photo | Editorial Judgment and Next Step |
|---|---|---|
| Upper and Suede | Whether corresponding panels, colors, and surface conditions of left and right shoes are visible | Request comparison photos when clearly inconsistent; don't conclude when light is insufficient |
| Toe | Whether contours, creases, and glue edges of both shoes are visible | Request frontal reshoot when only one shoe is shot or angle is too low |
| Sole | Whether forefoot, arch, heel, and edges are covered | Cannot judge overall outsole condition when coverage is incomplete |
| Stitching and Printing | Whether stitches, thread ends, and pattern edges are clearly shown | Request close-up original photos when small images are indistinguishable |
How to Compare Size, Color, and Accessories with Product Information
For size, first check whether the shoe box label, size marking inside the shoe, and order selection are consistent. The label in the photo must be clear enough to read key size information; if only a blurry outline is visible, do not infer the specific size yourself.
Color checking should be based on the selection on the product detail page. The product information shows a mocha primary suede colorway, but photos are affected by white balance, indoor lighting, and suede nap direction; cannot require the photo color to be exactly consistent with the color swatch on screen. More concerning is whether there is obvious left-right color difference, local uneven dyeing, or clear inconsistency with the selected colorway.
Accessories should be checked according to the content clearly listed on the product detail page. If the page only states matching laces or other accessories, and the photos do not fully show them, do not infer that the accessories are complete; you can request a flat-lay photo containing all accessories. When accessories are missing, colors do not match, or packaging labels cannot be read, pause further actions first.
Visible Defects and Matters Not Determinable from Photos
QC photos can help judge whether there are clearly visible problems in appearance, but their evidential scope is limited.
Generally, from clear photos, you can preliminarily check:
- Whether left and right shoes are the same colorway and similar appearance
- Obvious stains, cracks, damage, glue overflow, or broken threads
- Whether the toe and upper have obvious creases or deformation
- Whether prints, logos, and soles show clearly visible misalignment or abnormality
- Whether shoe box labels, size information, and some accessories are readable
Generally, cannot confirm based only on QC photos:
- Authenticity, brand authorization, or source legitimacy
- Real feel, thickness, and long-term durability of suede
- Wearing comfort, foot feel, support, and actual size fit
- Whether glue will continue to change after shipping
- Internal structure or hidden damage in areas not photographed
- Performance of ungluing, fading, and wear after future use
Therefore, the absence of problems in photos does not mean the product is free of problems beyond the photos. Editorial judgment can only help decide whether more evidence is needed; it cannot replace the shopping agent's after-sales rules or the seller's processing results. ⚠️
When to Request Reshoots or Pause Further Actions
Situations where you can continue processing are when key parts have clear, correctly corresponding, and fully covered photos, size labels match the order selection, color and accessories show no obvious conflicts, and there are no clearly visible major appearance issues.
Situations where reshoots are recommended include:
- Only one shoe, cannot compare left and right
- Toe, heel, or sole obscured by shadows
- Key stitching, printing, or size labels unreadable
- Upper color affected by strong light, cannot judge left-right differences
- Accessories not fully displayed
- Photos appear to be from another product or gallery correspondence cannot be confirmed
In the following situations, pause further actions, save photos first, and ask clear questions:
- Found obvious damage, cracks, large stains, or severe glue overflow
- Order size inconsistent with label information
- Color or accessories clearly not matching the selection on the product detail page
- Left and right shoes have obvious differences that cannot be explained by lighting or angle
- Key issues still cannot be confirmed after reshoots
Reshoot requests should specify the part, angle, and purpose, for example "Please take a frontal same-frame photo of left and right shoe toes to compare contours and panel colors", not just "Please take more photos". Before submitting, keep the product name, size, problem area, and original photo number to avoid mixing other products' photos into the record.
Next Steps: Save Evidence and Submit Checklist
After completing the inspection, save the QC photo records corresponding to this product and submit the check in the following order:
- Product name consistent with product detail page.
- QC photos entered via View QC Photos on the detail page.
- Size label, order size, and selected half size consistent.
- Upper, toe, sole, stitching, and printing of left and right shoes free of clearly visible abnormalities.
- Color roughly consistent with selected colorway, no unexplained left-right differences.
- Accessories listed on product detail page shown item by item.
- Which items are supported by photos, which items remain undeterminable.
- Whether reshoots are needed, or whether to pause further actions before reshoots.
Final decisions should be made based on QC photos, product detail page, shopping agent rules, and seller processing results together. If evidence is insufficient, keeping uncertainty and requesting reshoots is usually more prudent than approving based on blurry photos; but reshoots cannot become a guarantee of authenticity or quality.